Table of Contents
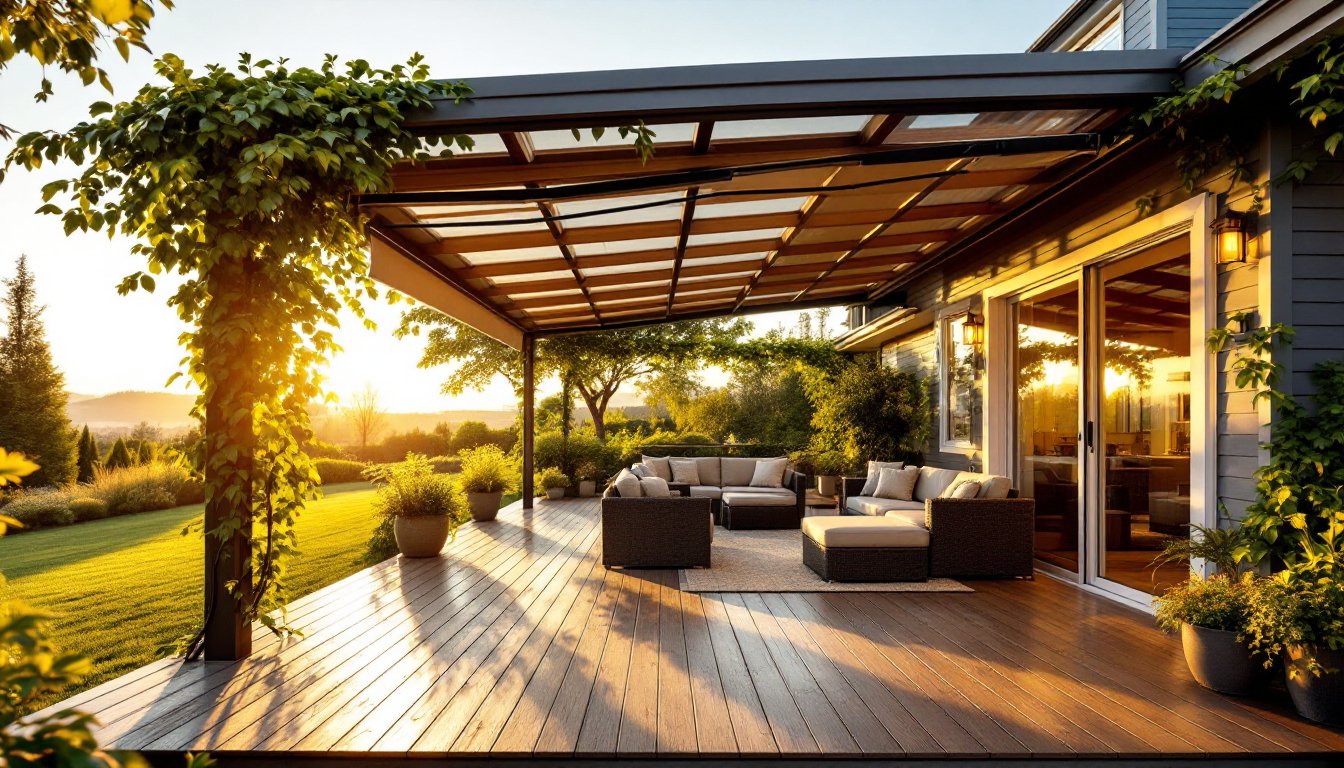
ToggleA covered back deck transforms how you live outdoors, creating a shaded retreat that extends your living space year-round while protecting furniture and guests from sun and rain. Whether you’re a DIY beginner or experienced builder, the options for covered deck ideas range from budget-friendly quick fixes to premium installations that add real estate value. The right cover keeps UV rays and water damage at bay, lets you host gatherings in comfort, and can be tailored to match your home’s architecture. Before diving into construction, consider your climate, local building codes (which often require permits for permanent structures), and whether you’ll tackle the project solo or hire help for complex framing or electrical work.
Key Takeaways
- A covered back deck extends your living space year-round while protecting furniture and guests from sun and rain, with options ranging from $300 budget-friendly solutions to premium $50,000+ installations depending on your needs and climate.
- Popular covered deck ideas include pergolas with dappled shade ($400–$2,500), retractable awnings for flexible protection ($300–$3,000), polycarbonate or metal roofing for full weatherproofing ($1,500–$2,500), and lattice with climbing vines as an eco-friendly option ($300–$800).
- Permanent structures like metal roofs and enclosed sunrooms require building permits and professional installation, while temporary solutions like shade sails and pop-up canopies typically avoid permitting and offer DIY-friendly installation.
- Before building a permanent cover, verify local building codes and permits, check that your deck structure can handle added load (especially for awnings and roofing), and mock up your design with temporary shade to confirm sight lines and usability.
- Enclosed sunrooms ($15,000–$50,000+) provide the ultimate year-round protection but demand professional design, engineering review, and foundation work, while DIY-friendly options like pergolas and lattice frames offer lower costs and seasonal flexibility.
- Climate and design preferences should guide your choice: harsh winters favor solid roofing, arid regions tolerate shade cloth, humid areas benefit from motorized retractable systems, and regional trends influence whether you choose traditional pergolas or contemporary metal systems.
Pergola Covers for Partial Shade
A pergola is a latticed overhead structure that provides dappled shade without blocking airflow, ideal if you want sunlight and ventilation during cooler months. Pergolas typically span 10–16 feet across and can be built from pressure-treated lumber, composite materials, or metal. The open-grid design lets rain through, so it works best in dry climates or as a summer-only solution.
For basic DIY pergola installation, you’ll need to set posts 4 feet deep in concrete footings on compacted soil, ensuring they’re plumb and spaced 8–10 feet apart. Use galvanized or stainless steel fasteners to prevent rust, and sand all lumber before staining or painting. If you want more shade, add shade cloth or retractable tarps clipped to the beams. A 12×12 pergola frame (materials only) runs $400–$800 for basic treated lumber: composite upgrades push costs toward $1,500–$2,500. Pergolas are typically cosmetic and don’t require permits in most jurisdictions, but always check local code since some areas require engineer-stamped plans for spans over 14 feet.
Retractable Awning Solutions
Retractable awnings offer flexibility, roll them out for shade on hot days and retract them to enjoy open sky and starlight. Motorized versions (battery or hardwired) cost more upfront but let you control shade from your phone or a wall switch. Manual hand-crank models start around $300–$600 for 10–12 feet of coverage: motorized units run $1,200–$3,000 depending on size and motor quality.
Most retractable awnings mount directly to your deck fascia or the rim joist of your deck framing, no footings needed. Installation typically takes 2–3 hours and requires drilling into existing structure, so it’s less invasive than building a permanent cover. You’ll need a drill with a countersink bit, lag bolts sized to your joist depth, and a helper to hold the awning steady during mounting. Wind sensors on motorized models automatically retract if gusts exceed 20 mph, protecting the fabric from damage. Maintenance is minimal: rinse the acrylic or solution-dyed fabric yearly and check fasteners annually. Check that your deck’s rim joist can handle the dead load (typically 30–50 lbs per 10-foot span) plus live loads from wind and snow pooling on the fabric, if your deck feels bouncy, you may need reinforcement from a professional.
Metal or Polycarbonate Roof Panels
For year-round weatherproofing, corrugated metal panels or polycarbonate sheets create a durable, semi-transparent roof. Polycarbonate offers the best light diffusion (about 80–90% transparency) and costs less than glass, while metal delivers superior durability and total weather protection. A typical 12×14-foot polycarbonate roof runs $800–$1,400 in materials: metal standing-seam roofing costs $1,500–$2,500 for the same area but lasts 40+ years.
Both options require solid framing, usually 4×6 or 4×8 pressure-treated beams on posts set in concrete footings, with 2×6 or 2×8 joists spaced 24 inches on center. Polycarbonate sheets attach with compression fittings and rivets: metal panels use fasteners or mechanical seaming. Slope the deck roof at least 3 inches per 12 feet of run so water drains properly, standing water accelerates panel degradation. Because a permanent roof adds structural load and requires weatherproofing, most jurisdictions demand a building permit and engineering review, especially if your deck is attached to the house (affecting load calculations). Electrical work for under-roof lighting or ceiling fans must meet the National Electrical Code (NEC) and be installed by a licensed electrician in most areas. This is a project worth hiring professionals for if you’re uncomfortable with height work, load calculations, or electrical integration.
Fabric Shade Sails and Canopies
Shade sails and pop-up canopies are lightweight, portable, and perfect for renters or those wanting a trial installation before committing to permanent cover. A high-quality shade sail made from solution-dyed polyester blocks 85–90% of UV rays and costs $400–$1,000 for a 16×16-foot triangle. Pop-up canopies start around $100–$400 for 10×10-foot models and pack down for seasonal storage.
Shade sails need tensioning to three or four anchor points, usually corner posts, deck railings, or existing fence posts. Install lag bolts or eye bolts rated for 500–800 lbs of pull per anchor point depending on sail size and local wind speeds. Use stainless steel hardware in coastal regions to resist salt corrosion. Pop-up canopies simply place and stake them down: no drilling required. The trade-off is durability, fabric degrades under continuous UV exposure over 5–7 years, and wind gusts over 25 mph can tear or uproot unsecured sails. These solutions sidestep most permitting because they’re technically temporary structures, but verify your local code. For DIYers, this is one of the most budget-friendly and installable options if you’re comfortable climbing a ladder and using basic hand tools. Protective eyewear and work gloves are all the PPE you’ll need.
Enclosed Sunroom Extensions
An enclosed sunroom fully weatherproofs your deck, turning it into a three-season or year-round room with walls, a roof, and often HVAC integration. This is the premium option, professional installations cost $15,000–$50,000+ depending on size, materials, and whether you’re adding insulation, climate control, or electrical service. A modest 12×14-foot aluminum-frame sunroom with tempered glass or polycarbonate walls runs $8,000–$15,000 installed: high-end custom builds with engineered structural support and dual-pane windows exceed $30,000.
Because you’re creating an enclosed conditioned space, nearly all jurisdictions require a building permit, an engineer-stamped floor plan, and often a foundation inspection. Local building codes may mandate insulation values (R-values), egress windows if the space is being used as a bedroom, and electrical outlet spacing per the NEC. If your deck lacks a continuous foundation (most don’t), you’ll need to pour a footing or slab, another $2,000–$5,000. This project demands professional design and installation. Many homeowners hire a contractor for framing and roofing, then finish interior carpentry themselves to save costs, but structural and electrical work should go to licensed professionals. The payoff is year-round usability and modest resale value recovery (typically 50–75% of installation cost in most markets).
Lattice Covers with Climbing Vines
Lattice panels topped with climbing vines create living shade that’s attractive, cost-effective, and supports local pollinators. Pressure-treated or vinyl lattice panels (4×8 sheets) cost $30–$80 each: you’ll typically need 2–4 panels per 12-foot span depending on how dense you want the coverage. Vinyl lasts longer and doesn’t need staining, while treated wood requires periodic maintenance but costs less upfront.
Frame lattice between posts using 2×4 pressure-treated lumber secured with galvanized bolts and lag screws. Space frames 6–8 feet apart, and ensure posts are properly set in concrete footings. Plant vigorous, locally-adapted vines, clematis, climbing roses, hops, or kiwi, at the base. These typically take 2–3 seasons to fully cover a span, providing light dappled shade. This approach works especially well in warmer climates where deciduous vines create summer shade and let winter sun through. Cost is very low ($300–$800 for a basic 12×12-foot installation), and no permit is usually needed since it’s considered a shade structure, not a roof. Water vines regularly during establishment, and plan for annual pruning and training. It’s an excellent beginner project and free DIY furniture plans and woodworking tutorials offer simple lattice frame designs if you’re comfortable with basic cutting and fastening.
Budget-Friendly vs. Premium Options
Your choice depends on durability needs, climate, and long-term commitment. Budget-friendly picks include shade sails ($400–$1,000), lattice with vines ($300–$800), and hand-crank awnings ($300–$600). These work best for seasonal use or trial installations and can be installed or adjusted by most confident DIYers. Covered deck ideas range from simple to elaborate, so research options that match your region and lifestyle before building.
Mid-range solutions like DIY pergolas ($800–$1,500) and motorized awnings ($1,200–$2,000) offer better durability and year-round usability. Many DIYers can handle pergola framing with proper joist spacing and concrete footing work: motorized awnings are easier if your deck structure can support the weight. Premium options, polycarbonate or metal roofs ($1,500–$2,500) and enclosed sunrooms ($15,000+), require permits and professional installation but deliver lasting value and full weather protection. Consider local climate: harsh winters demand solid roofing: arid regions tolerate shade cloth: humid areas benefit from motorized retractable systems for moisture control. Regional design trends matter too, Southern home design and porch ideas often favor traditional pergolas or wraparound screens, while contemporary aesthetics lean toward clean-lined metal or aluminum systems. Before committing to a costly install, mock up your vision with temporary shade cloth or a pop-up canopy to confirm sight lines, shading patterns, and usability. Most DIY failures come from skipping this validation step.