Table of Contents
ToggleYour bedroom walls don’t have to whisper, they can sing. Whether you’re working with 150 square feet or a sprawling master suite, the right wall treatment can shift the entire mood of the room from tired to transformed. Creative bedroom wall ideas range from bold paint techniques to textured surfaces, and most of them are entirely DIY-friendly. The good news: you don’t need a designer’s budget or a contractor’s license to pull off professional-looking results. This guide walks through seven proven approaches to reinvent your bedroom walls, complete with practical tips on execution, materials, and honest assessments of difficulty.
Key Takeaways
- Creative bedroom wall ideas like accent walls, bold color blocking, and textured treatments can transform a room without requiring a designer’s budget or professional contractor.
- Peel-and-stick wallpaper and removable wall decals offer flexibility for renters and those wanting easy updates, but perform best on smooth, clean walls and last 3–5 years before adhesive weakens.
- Proper preparation—including clean walls, quality painter’s tape at 45-degree angles, primer application, and removing tape while paint is slightly tacky—determines success more than the materials themselves.
- Strategic lighting, such as warm-white wall sconces at eye level (60–66 inches) and LED uplighting, dramatically enhances paint color and texture while creating mood and visual depth.
- Choose between permanent, high-impact options like shiplap and murals or flexible alternatives like paint and removable decals based on your home ownership status, budget, and comfort with DIY complexity.
Paint Techniques That Go Beyond Basic Color
Accent Walls and Bold Color Blocking
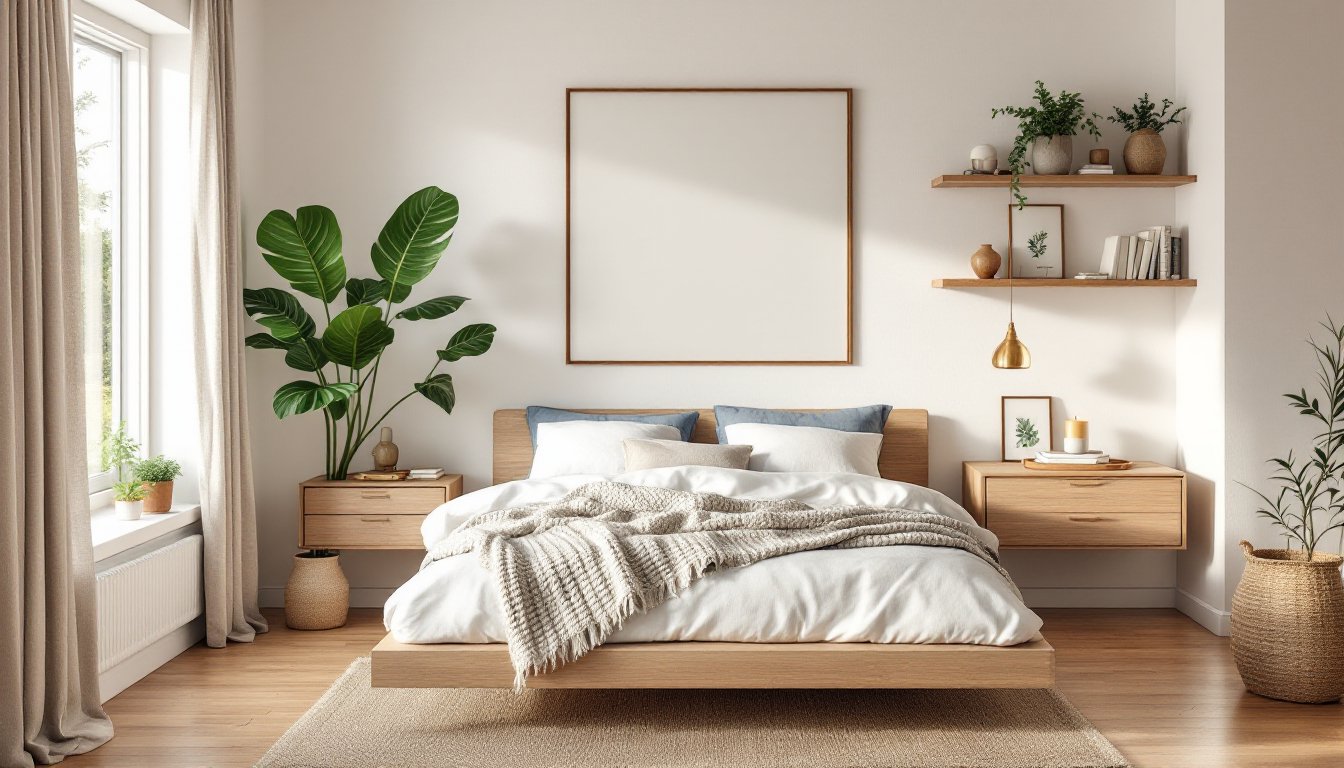
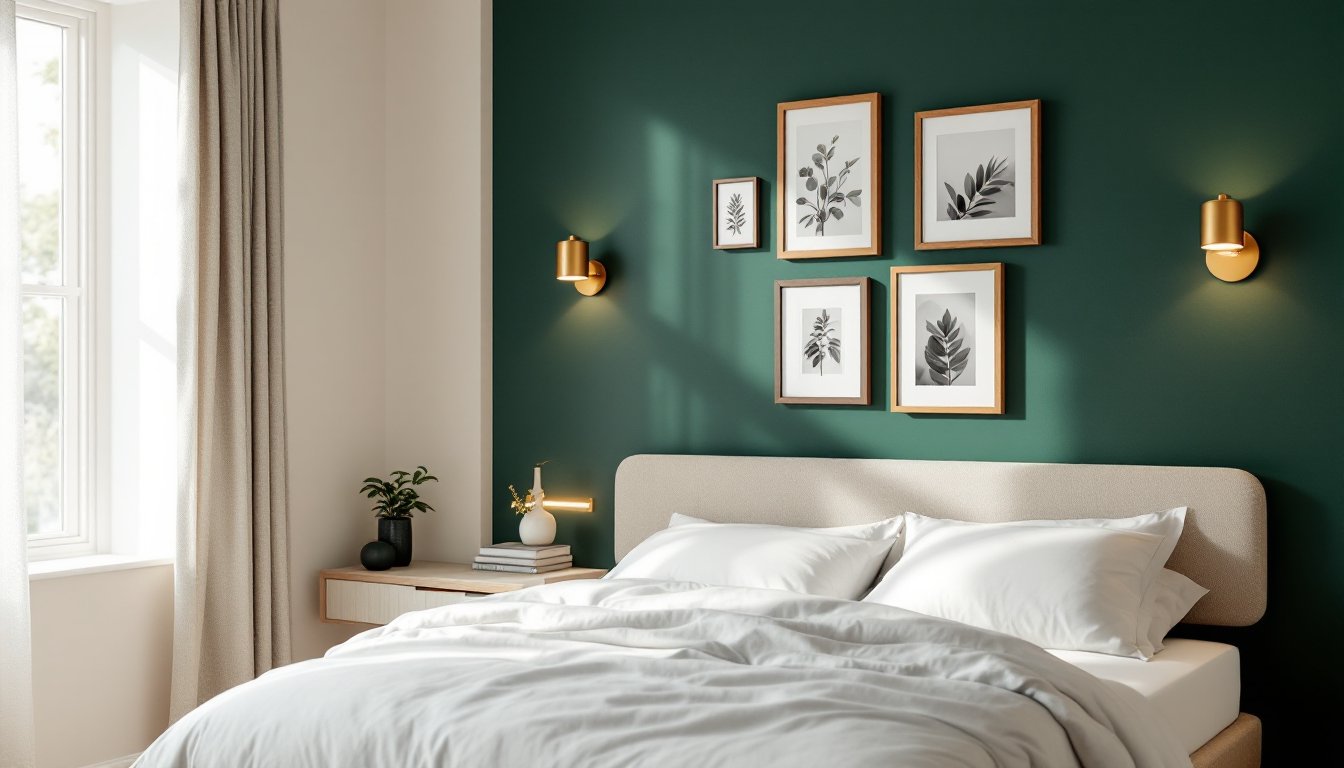
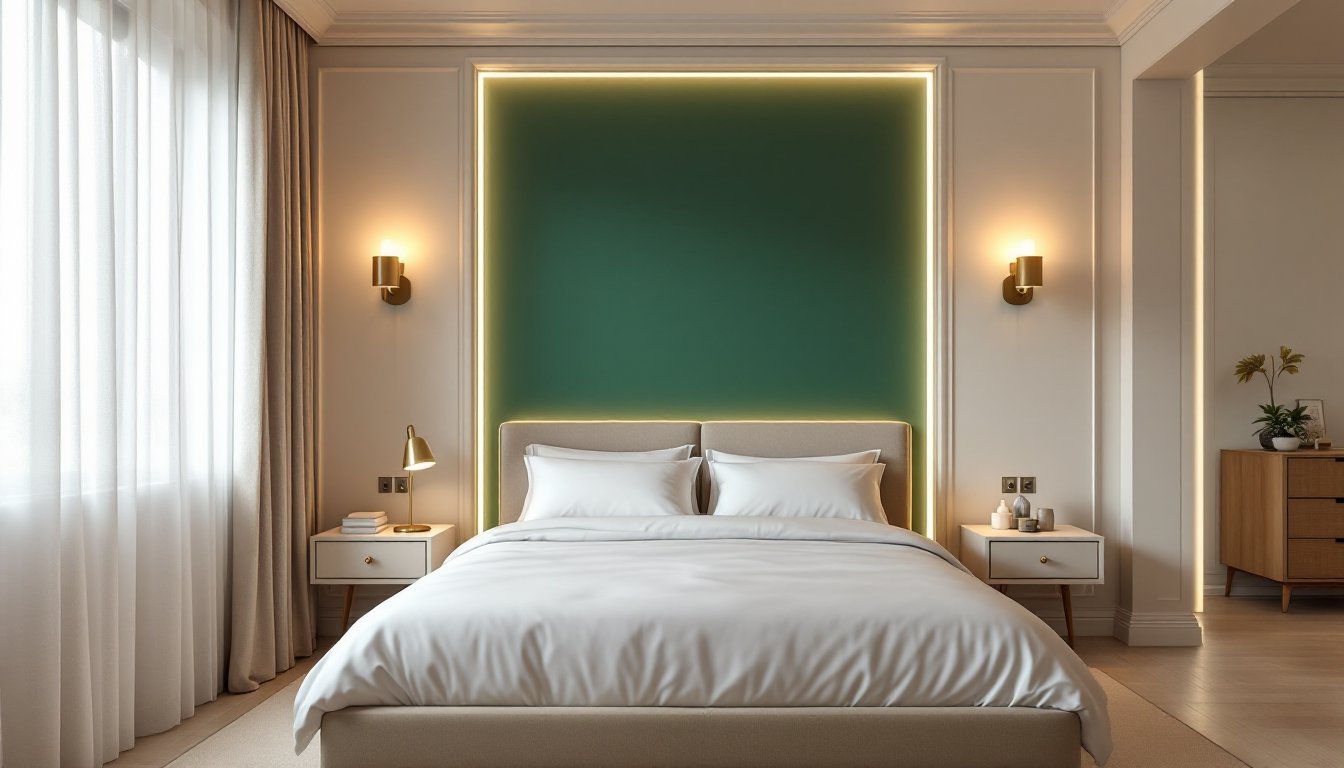
A single accent wall, painted in a contrasting, deeper, or warmer tone, can redefine a bedroom’s proportions and personality without the commitment of painting every surface. Pick the wall that anchors the room visually: usually the wall behind the bed. This anchoring effect works because our eyes naturally settle there first.
Bold color blocking takes it further. Instead of painting an entire wall one shade, you divide it into geometric sections, squares, rectangles, or even triangular bands, and paint each in coordinating colors. This requires proper planning and masking. Use quality painter’s tape (blue or green, not yellowed tape that’s been in the garage for three years) applied at a 45-degree angle for the cleanest lines. Press it down firmly with a putty knife to prevent paint bleed underneath.
For execution, measure twice, mark with a pencil, then tape. Apply primer first if switching from a light base to dark color or vice versa, one coat of primer beats two coats of finish paint. Use satin or eggshell finish for bedroom walls rather than flat: it hides minor imperfections but cleans easier if you later need touch-ups. Let paint dry fully between coats (check the can: most latex paints dry to touch in 1–2 hours but benefit from 4 hours between coats). Remove tape while the final coat is still slightly tacky, this prevents peeling dried paint off the tape edge.
Wallpaper and Wall Coverings for Maximum Impact
Peel-and-Stick Options for Easy Updates
Traditional wallpaper requires sizing, a paste brush, a seam roller, and steady hands. Peel-and-stick wallpaper, or removable wall decals in larger formats, sidesteps all that. Stick one wall, peel it off cleanly when you’re ready for a change, no residue or damage (assuming your wall is smooth and not freshly painted with glossy latex).
The catch: peel-and-stick performs best on smooth, clean, flat surfaces. If your walls have textured drywall compound, popcorn ceiling texture bleeding onto the wall, or any dust, the adhesive won’t grip evenly. Clean walls with a slightly damp microfiber cloth beforehand. For larger installations, use a squeegee or plastic smoother to press out air bubbles as you apply the product. Work from the center outward to avoid trapping air pockets.
Quality varies wildly. Thinner films ($1–3 per square foot) peel cleanly but offer less durability and pattern definition. Heavier, premium peel-and-stick ($5–12 per square foot) mimics traditional wallpaper in texture and longevity. If budget allows, invest in the thicker option for master bedrooms where you’ll see it daily. For guest rooms or kids’ spaces where trends shift faster, the economical option makes sense. Apply over clean, smooth walls, and most removable products last 3–5 years before adhesive weakens.
Texture and Dimensional Wall Treatments
Smooth drywall is blank canvas, but textured walls add depth. Shiplap, the horizontal or vertical wood-plank look, has become iconic for bedrooms because it creates visual rhythm and works with modern, farmhouse, or transitional styles alike. You can install real hardwood shiplap, which demands cutting, nailing, and sealing, or use MDF shiplap panels (lightweight, faster, more forgiving on uneven walls).
Real shiplap (solid wood) runs $1–3 per linear foot, plus paint or stain. MDF shiplap costs 30–50% less but won’t hold nails or screws as firmly and isn’t suited for high-moisture bathrooms. For a bedroom, MDF is fair game if you’re adding texture without expecting it to bear weight. Install it with construction adhesive and finishing nails every 12–16 inches. Use a stud finder to locate wall studs for maximum grip. Paint after installation, using the same primer-and-finish approach as regular drywall.
Board and batten, vertical strips of wood (batten) covering the seams between wider boards (boards), offers similar visual impact with a more tailored, contemporary feel. Textured drywall compound, applied with a trowel or spray, adds subtle dimension without the material cost of wood. Depending on technique, you get anything from a fine sandy texture to dramatic orange-peel or popcorn (though popcorn is less fashionable now and harder to patch later).
When choosing texture, remember: it’s harder to clean than smooth drywall, it can amplify dust in bedrooms with poor ventilation, and it’s more labor-intensive to paint. Smooth walls are easier to maintain long-term.
Wall Decals, Murals, and Artistic Expression
Wall decals, large, pre-made designs in vinyl, let you add instant art without painting or wallpaper commitment. A forest silhouette, geometric pattern, or inspirational quote can redefine a wall in under an hour. Application mirrors peel-and-stick wallpaper: clean the wall, peel backing, apply, smooth out bubbles, and done.
Murals go bigger. A hand-painted or printed mural (forest, night sky, abstract shapes) becomes the room’s focal point. If you’re not confident painting freehand, print a grid pattern on a image, draw a matching grid lightly on the wall in pencil, and transfer the image square by square, a technique that works for surprisingly complex designs. Alternatively, hire a local artist for $500–2,000 (wildly variable by region and size), or use a wall mural service that prints custom designs on adhesive vinyl sheets, ready to install like giant wallpaper.
Decals and murals work best in bedrooms where they won’t clash with constantly changing furniture or bedding. A mural behind the bed is permanent-feeling: decals on a side wall feel more flexible. Both are excellent for renting situations when you need visual impact without structural changes. Just verify with a landlord first and test adhesive on a small, inconspicuous area to confirm it won’t damage paint or drywall.
Lighting Features That Enhance Your Wall Design
Even the most carefully chosen wall color falls flat under harsh fluorescent overhead light. Strategic lighting, installed into or aimed at your walls, transforms the look and feel of the entire bedroom.
Uplighting (lights at floor level aiming upward along a wall) creates drama and makes walls appear taller. LED strips ($20–80 per 16-foot roll) adhere behind furniture or along baseboards and plug into standard outlets or run on batteries. They’re flexible, dimmable, and cool to touch. Wall sconces flanking the bed serve dual duty: mood lighting for reading and accent illumination that flatters paint color and texture. Install them at eye level (roughly 60–66 inches from the floor) and use warm-white bulbs (2700K color temperature) in bedrooms to avoid clinical blue-white harshness.
Cove lighting, recessed lights hidden in a soffit or crown molding, bathes the upper wall and ceiling in indirect glow. This requires framing (studs, drywall, electrical work) and is best reserved for new construction or major renovations. For renters or quick updates, consider standalone uplighting or LED strips instead.
Paint or wallpaper color shifts dramatically under different light temperatures. Test samples under your existing lighting, then again under any new lights you plan to install. What looks perfect under warm-white wall sconces might appear washed-out under daylight. A quick rule: warm-white bulbs (2700K) complement warm paint tones (warm grays, terracottas, warm whites): cool-white (4000K) works with cool grays and blues. Don’t overlook this detail, lighting makes or breaks the final effect.
Choosing Your Bedroom Wall Transformation
The best bedroom wall idea is the one you’ll live with joyfully. Start with honest self-assessment: do you prefer a permanent, high-impact statement (shiplap, mural, traditional wallpaper) or flexibility to refresh easily (peel-and-stick, paint, removable decals)? Budget, rental vs. owned home, and your tolerance for DIY complexity all shape the decision. Prep work, clean walls, proper primer, correct tape application, often determines success more than the materials themselves. When in doubt, test on a small area first. Your future self, gazing at a well-executed accent wall or textured finish, will thank you for the care.